Quilting made easy: create a beautiful cheater quilt in no time

Quilting made easy: create a beautiful cheater quilt in no time
Are you longing to create a beautiful quilt but feel overwhelmed by the intricate skill and time commitment involved? Look no further than the cheater quilt! I am a VERY new sewist and I just made this cheater quilt from my Wild Autumn fabric collection.
This beginner-friendly quilting technique allows you to achieve stunning results in no time at all.
In this article, I will guide you through the steps of making a cheater quilt, showing you how to effortlessly combine custom pre-printed fabric panels to achieve a gorgeous and professional-looking quilt using Spoonflower’s fun Fill-a-Yard feature.
What you’ll learn in this easy cheater quilt tutorial
The cheater quilt technique is perfect for those new to quilting or for anyone looking to create a quick and easy gift, from selecting your fabric panels to assembling the quilt top, layering with batting and backing, and finishing with the perfect border.
My step-by-step cheater quilt instructions will walk you through the process:
Calculating and ordering the fabric and supplies you’ll need
Basting and assembling your quilt with ease
Sewing a professional-looking quilt with your basic home sewing machine
Making quick custom quilt binding
Finishing your quilt
With a few of my helpful tips and tricks, you'll be amazed at how fast and simple it is to create a stunning cheater quilt that looks like it took months to make.
So, now let’s gather our fabrics and get ready to enjoy the satisfaction and pride of creating a beautiful quilt in no time!
You’ll need the following supplies for your cheater quilt:
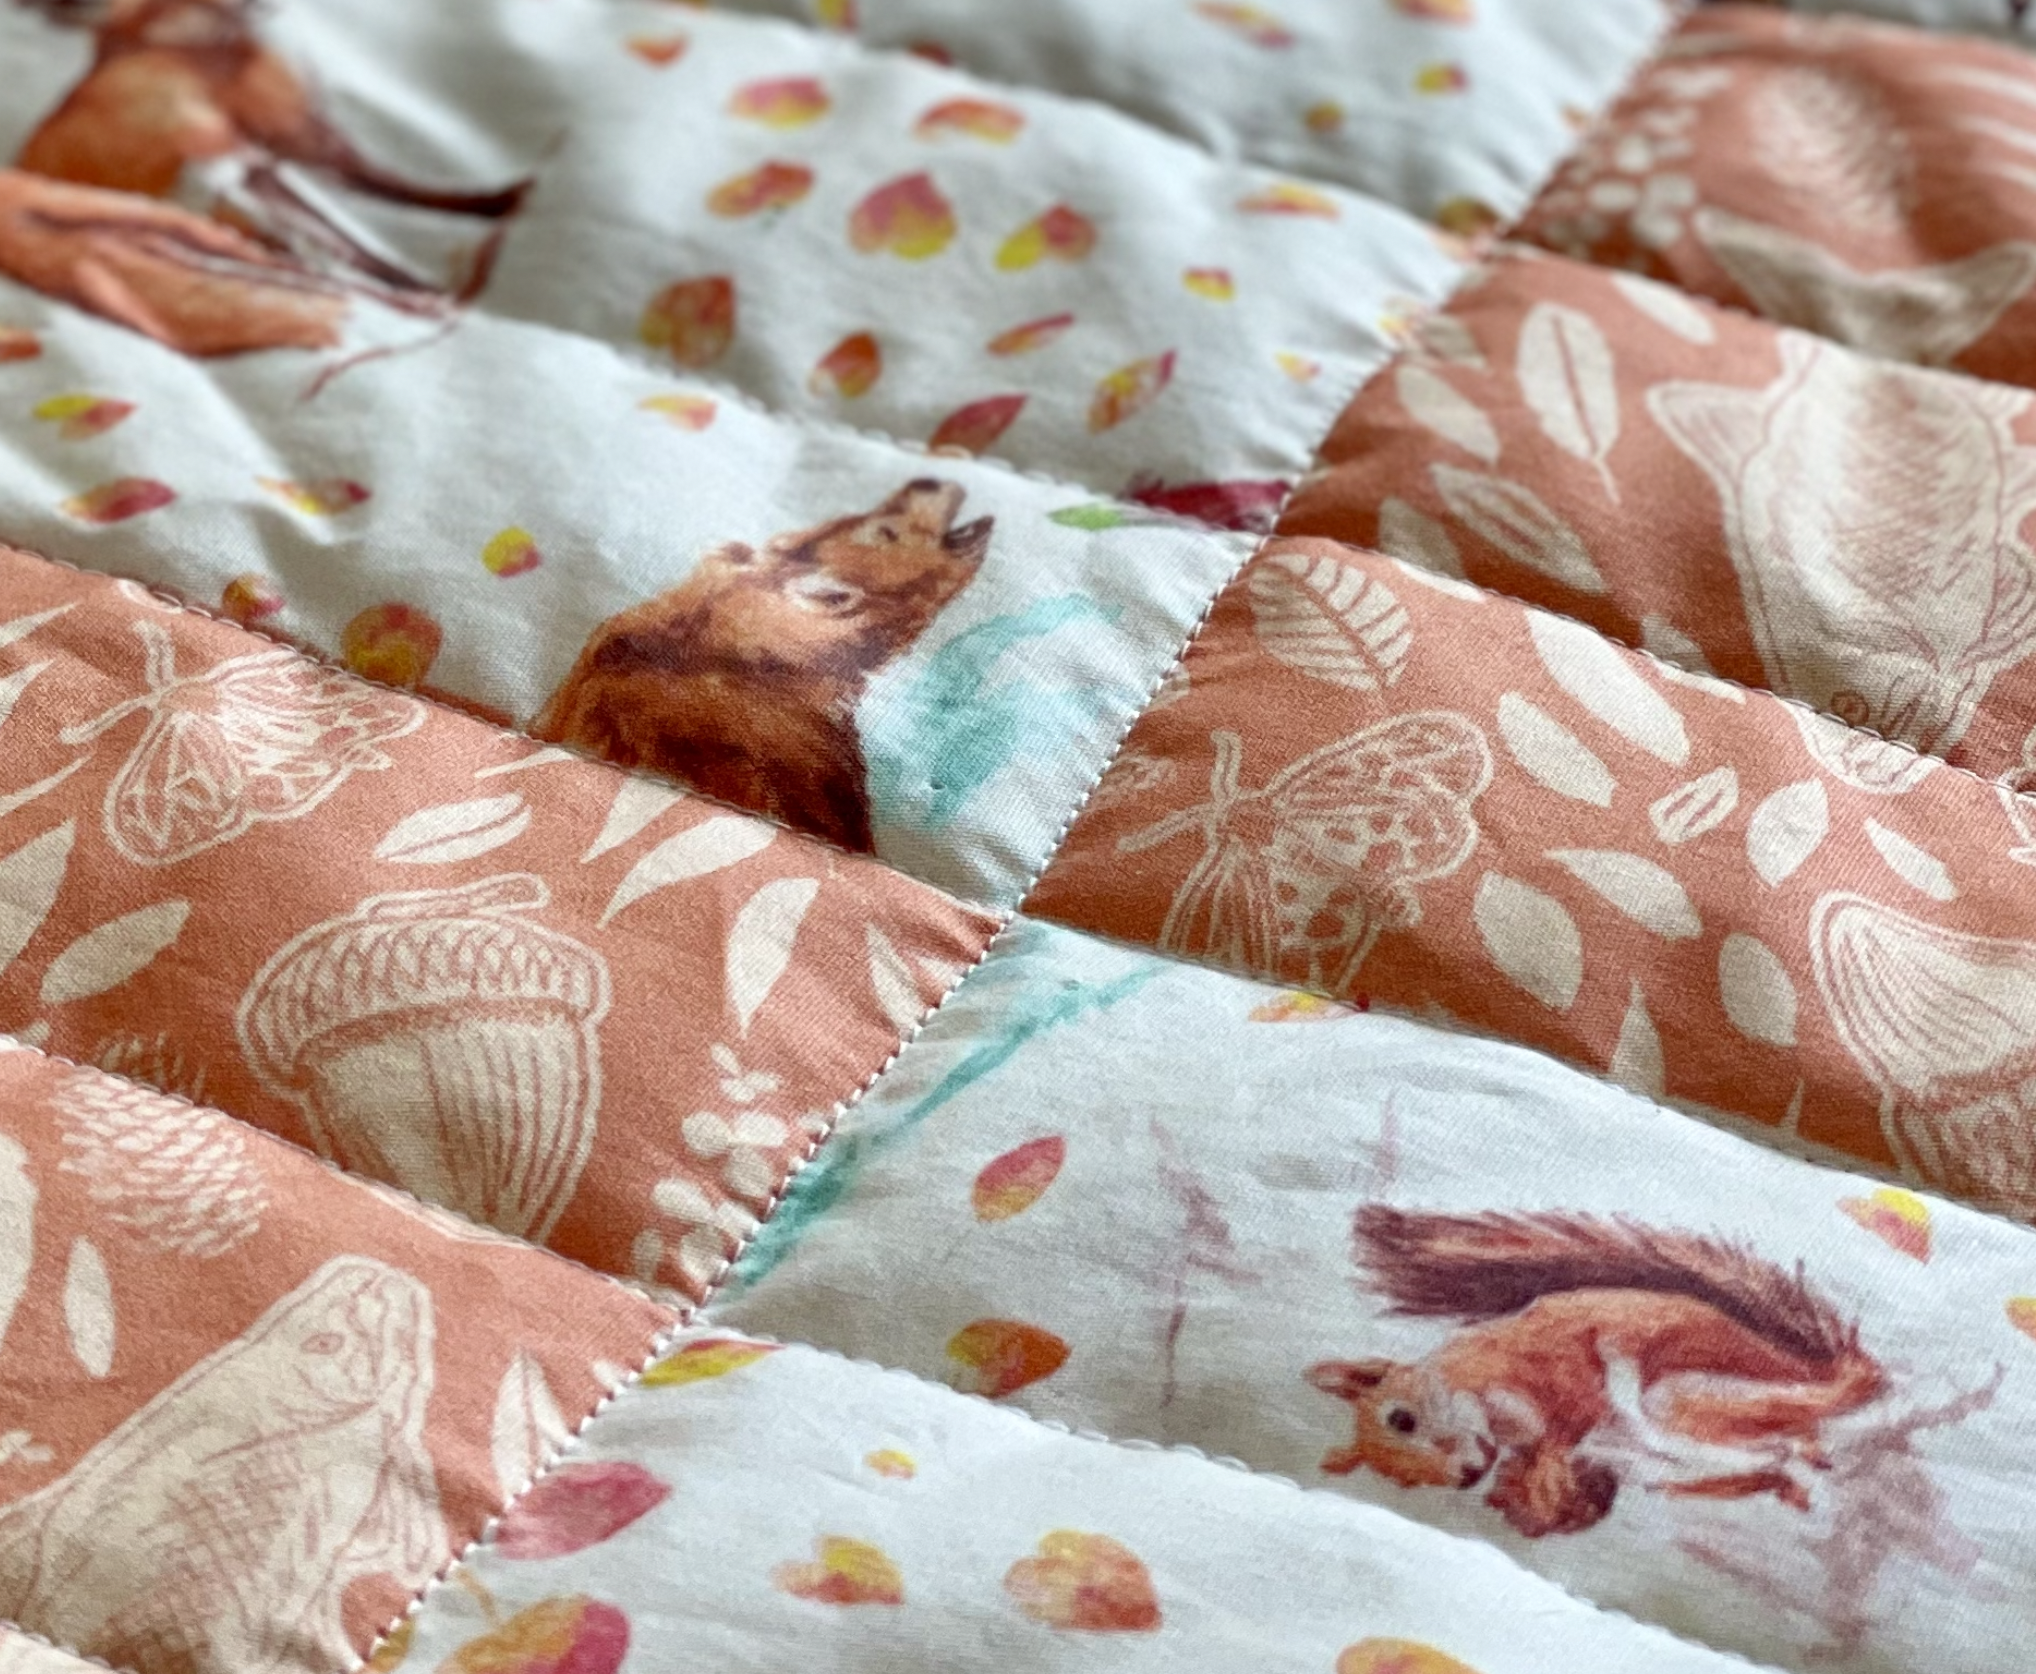
Quilt Top: 1 yard of Fill-a-Yard (I used my Wild Autumn Collection available here)
Quilt Back: 1 yard of coordinating fabric (I used this print)
Fabric for binding (I’ll show you how to make it)
A regular ol’ home sewing machine (I have this Brother)
Step 1: Design and order the cheater quilt fabric at Spoonflower.com
For the quilt top:
To get started, head to a collection on Spoonflower. I will be using my Wild Autumn collection for this quilt.
Choose “Start Designing”
Choose 1 yard (up to 42 designs)
Choose a fabric (either Cotton Poplin or Petal Signature Cotton will work great) — I used Cotton Poplin.
Start designing your quilt by selecting a design from the collection and clicking into the square you want to fill. When you’re done, click “Add to Cart”.

For the quilt back:
Make another cheater quilt of the same size and same fabric as the top.
This time, fill it with all one design. I chose the Wild Harvest (Small) design for the back of my quilt.
Choose Add to Cart.
For the binding fabric:
Choose another coordinating fabric for the binding. I chose my Watercolor Wash fabric in Coral from the Wild Autumn Collection.
Add enough of the same type of fabric you chose earlier (I chose Cotton Poplin) to your cart. I ended up needing 10 inches of 42-inch-wide fabric, but I ordered a yard of this fabric to use the rest for other projects.
-
We will be using a 2-1/2” strip of fabric for the binding, and so you will need inches of 42-inch wide fabric to make the binding. I went ahead and ordered a yard of binding fabric so I could use it for other projects.
In case you’re interested, here’s how I calculated how much fabric and how many strips you need for the binding:
Perimeter of the quilt/Width of Binding Fabric = Number of strips (rounded up to the nearest whole number)
In this case, our quilt’s perimeter is 36 + 36 + 42 + 42 = 156 inches.
156 inches/42 inches = 3.71 — so we will round up to 4 strips of 42-inch wide fabric.
4 x 2.5” = 10 inches of fabric required to make (4) 42” wide x 2.5” tall strips.
Step 2: Gather your other tools and supplies
While you’re waiting for your custom-designed fabric to arrive, you’ll want to gather the following supplies:
1 yard of Quilt Batting — I used this Fairfield Poly-Fil Low-Loft Batting Crib 45" X 60" from Amazon, as it’s specifically for baby quilts and is almost the perfect size.
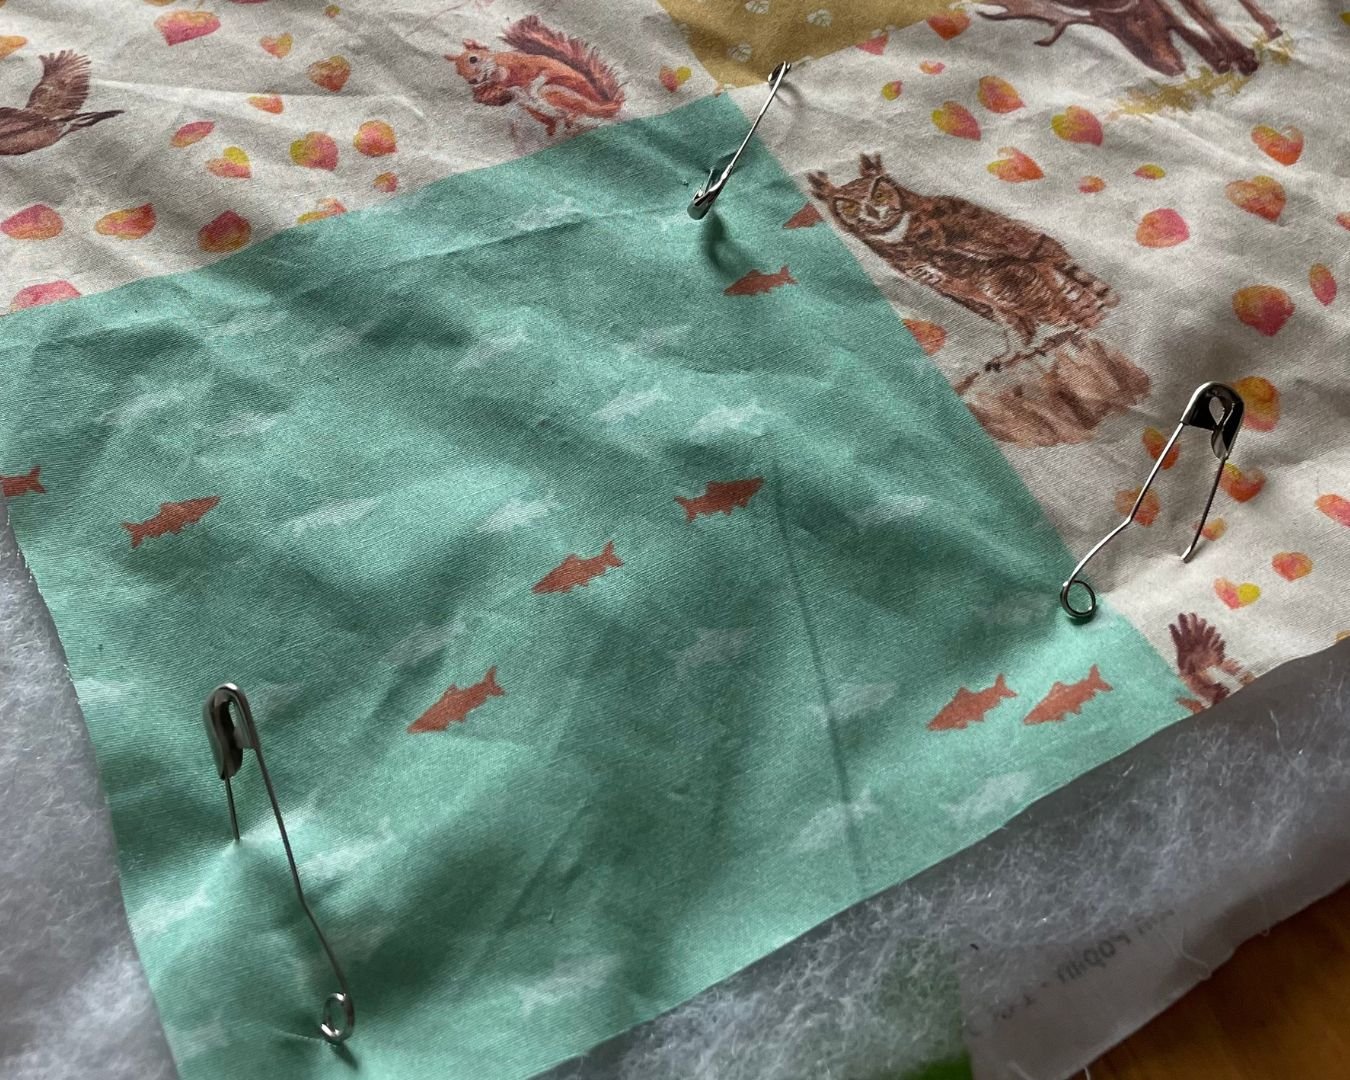
Quilt basting pins - I used these Curved Safety Pins for Quilting from Amazon.
Sewing Machine - i have a Brother sewing machine like this one — it’s a great multi-purpose machine.
Step 3: Baste your cheater quilt (pin the layers together)
Before you do anything, you’ll want to machine wash and dry your fabric. A quick wash cycle should do the trick!
If you're getting ready to quilt, there's a crucial step you need to take first: basting. Basting involves joining the three layers of the quilt to prevent any shifting during quilting. Here's how you can do it:
Prepare your workspace. You'll need a flat and clean surface that's large enough to accommodate your quilt. If your floor is clean and free of debris, you can use it. Alternatively, you can use a large table or a design wall if you have one. I simply swept my hardwood floor clean and used that!
Iron your quilt top, batting, and backing fabric to remove any wrinkles or creases. This will ensure a smooth and even surface.

Lay your backing fabric on your workspace with the wrong side facing up. Use masking tape to secure the backing fabric to the floor or table. Ensure the fabric is taut and wrinkle-free.
Place your batting on top of the backing fabric. Smooth it out and ensure there are no wrinkles.
Place your quilt top on top of the batting, right side facing up. Ensure it's centered and straight. You should have three layers stacked on top of each other: backing fabric, batting, and quilt top.
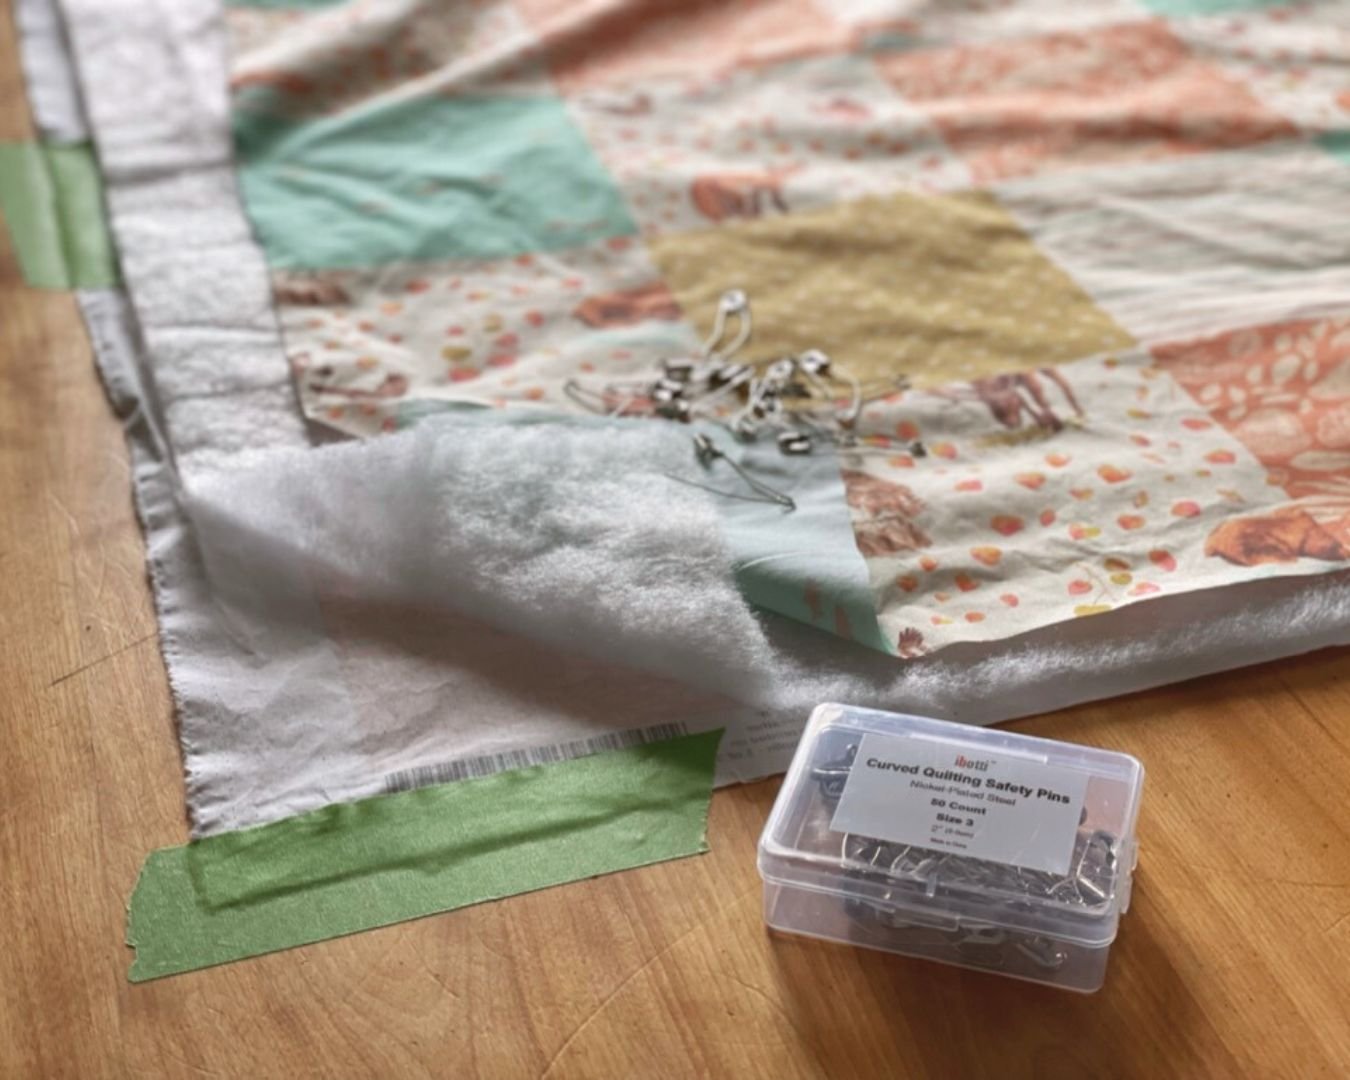
Starting at the center of the quilt, work your way outward, smoothing out any wrinkles as you go. Use curved safety pins or basting spray to hold the three layers together. I like the curved safety pins myself because it keeps the layers from bunching up.
Space the pins or spray approximately 4-6 inches apart. Ensure the layers remain smooth and wrinkle-free.
Once you've secured the quilt layers, remove the tape and reposition the quilt if necessary.
Using curved safety pins, baste around the edges of the quilt to hold the layers in place. Space the pins approximately 3-4 inches apart.
Step 4: Start sewing your cheater quilt
Now that your layers are basted, you can begin quilting! First, you’ll want to prepare your workspace. Ensure you have enough room to work on your quilt comfortably.

Choose your quilting thread and needle. The thread should match the color of the fabric or contrast if you want the stitches to stand out. I used white thread.
If you're using a sewing machine, select the quilting stitch and adjust the stitch length to your desired size. If you're hand quilting, use a quilting needle with a small eye and a sharp point. I used a stitch length of 3.5 and sewed a line every 2 inches (each square is 6 inches wide).
Start quilting in the center of the quilt and work your way outward. This will prevent the quilt from shifting or bunching up.
To keep your stitches even, you can use a walking foot with a guide set to 2 inches (see photo below).

Take your time and work on one section of the quilt at a time. Use your dominant hand to guide the needle, and your other hand to hold the quilt layers taut.
When you finish quilting one section, tie off the thread and start on the next section. Don't worry about the loose threads as you can trim them later.
If you're machine quilting, take breaks often to check the underside of the quilt for tension and adjust your stitch length if needed.
Once you've finished quilting, trim any loose threads.
Trim the edges of your quilt using your rotary cutter and mat. Make sure the corners are 90 degree angles to make sewing the binding easier!

You can serge the edge of the quilt to prepare it for binding. I didn’t own a serger when I made this quilt, so I used my machine’s overlock foot and overlock stitch instead, which mimics the stitch from a serger, pretty cool!
You can also use a narrow zigzag stitch. Just make sure your zigzag stitch is less than 1/4” wide so it will hide behind the binding’s seam allowance.

I used my Brother sewing machine’s overlock foot and overlock stitch to finish the raw edges of my cheater quilt. You can also use a serger, or a narrow zigzag stitch here.
Step 5: Make the cheater quilt binding
Cut your binding fabric into strips. The strips should be the length of the perimeter measurement from above, plus an extra inch for safety, and the width of your binding plus 1/4 inch for seam allowance.

Join the strips together to make one long strip. To do this, place two strips right sides together at a 90-degree angle and sew diagonally from the upper left corner to the lower right corner. Trim the excess fabric and press the seam open. Repeat with remaining strips until you have one long strip of binding.

Press the binding strip in half lengthwise with wrong sides together, making sure the edges are aligned.

Step 4: Attach the cheater quilt binding
Starting in the middle of one of the sides of the quilt, unfold the binding strip and align the raw edge with the raw edge of the quilt. Use binding clips or pins to secure the binding to the quilt top. Leave a tail of about 6 inches at the start.

Sew the binding to the quilt top, using a 1/4-inch seam allowance, stopping 1/4 inch from the corner. Backstitch to secure.

Fold the binding up and away from the quilt top, forming a 45-degree angle at the corner. Then, fold it back down over the next side, aligning the raw edge with the next side of the quilt.


Continue sewing the binding to the next side, repeating steps 5 and 6 at each corner until you reach the starting point.
Trim the excess binding, leaving a 6-inch tail. Fold the end of the binding back on itself and clip or pin it in place.
Sew the two tails together, making sure the ends are aligned, and the binding is not twisted. Trim the excess fabric and press the seam open.
Fold the binding over to the back of the quilt and use a hand-sewing needle or sewing machine to stitch it down. Be sure to catch both the backing and the folded edge of the binding with your stitches.

Once you've finished sewing the binding to the back of the quilt, press it flat.

Wasn’t that fun? Show me your cheater quilt!
It really is that simple! Making a cheater quilt from Spoonflower fabric is a fun and easy way to create a stunning quilt that's perfect for any skill level.
With my nature-themed fabric designs and Spoonflower's custom printing, the possibilities are endless.
So, gather your supplies, choose your favorite designs, and get ready to create a beautiful quilt that you'll treasure for years to come. Happy crafting!

Don't forget to tag me @pineandfeather on Instagram or use the hashtag #pineandfeatherstudio with your projects so I can share and support your handmade businesses.
If you click on links in this post and make a purchase, I may make a small commission at no extra cost to you. This helps keep annoying pop-up ads off my site. I only recommend products that I’ve personally used and believe in. Learn more here.
You might also enjoy


On September 12th, the Warhawk Air Museum opened its new Global War on Terror Wing, where I unveiled a year’s worth of design work. I created custom toile-inspired wallpaper honoring the GWOT era (produced through Spoonflower’s Trade Program) on durable, scrubbable Type II vinyl—along with three interactive kiosks and enhanced experiences for the Warhawk Mobile App. This project brought together my love of engineering, aircraft, UX/UI design, storytelling, and illustration into one immersive space. If you’re local, I invite you to visit and support the museum—and if you’re an interior designer seeking custom wallpaper (or a variation of this pattern), let’s connect!